More Features
Autolock
We introduced an autolocking feature in version 1.1. This is the first version and might change slightly in future implementations, but the concept should stay the same basically.
For those who already know what that is, below is a tl;dr, but for everyone else, since we come from a laser physics background, let’s have a little look at our use case, which should be generalisable to other problems.
tl;dr ADwin implementation
The autolock feature has a few parameters you should know:
Bitregisters, managing the state of the Lock for each servo (we have to split it because we can only use 32 bits per PAR where the last would be the sign):
PAR_19: bit 1-8 search state, 9-16 locked state, 17-24 relock state
PAR_20: bit 1-8 greater state, 9-16 rampmode state
Float values, managing the parameters of the lock in a list (with 32 entries):
Data_8: indices 1-8 aux threshold, 9-16 aux threshold break, 17-24 ramp offset, 25-32 ramp amplitude
Data_9: indices 1-8, lock float iterator variable for each servo, will range from -1 to 1
Data_11: indcies 1-8, lock step size as a float, will be something small
tl;dr Servo values
On the servo we can access the boolean values handling the state using the properties
lockSearch,locked,relock,lockRampmodeandlockGreaterAccess the float parameters using
lockThreshold,lockThresholdBreak,lockOffsetandlockAmplitudeYou can also set the
lockFrequencywhich will directly translate to somelockStepsize, but the frequency is more descriptive
tl;dr Command line
Run the autolock from the command line using servo.lockAnalysis() and servo.autolock() (where servo refers to a valid Servo instance)
We use one input, namely the aux channel as the actual voltage of a photo diode. Our output corresponds to the voltage of a servo, a little piezo crystal which sets the length of a resonator or some similar component in front of the photo diode. The purpose of the digital control of course is to vary the resonator length by varying the output signal until a resonance peak is found – which should be visible in the aux signal. Mostly, the signal will be close to zero or constantly very small (maybe due to a slight offset of the component) and only around the resonance point a peak will be found. That is the point we want to lock to.
For that reason one should look at the signals prior to using the lock in order to set the direction (above/below) and the threshold value (e.g. the majority of the signal could be at -0.03 and the peaks could point in the minus direction, ranging up to -0.08). In order to determine these values it is useful to just activate the ramp on the target channel and check the aux signal.
Have a look at the plot below. The resonance peaks in the center plot are what we want to lock too, the ramp plot on the bottom shows the signal used as the output. An acceptable threshold line would be the grey one drawn in the center plot, which sits around 6,3 V. Depending on your setup, the peaks might also point upwards, thus you can adjust the greater boolean (in this case set it to greater=False).

As of v1.3 we automate this process by calculating the median value of the aux signal and determining the threshold in comparison. Thus, the lockThreshold, lockThresholdBreak and lockGreater do not have to be set manually. (When in command line, run servo.lockAnalysis().) We will always set the threshold break at 40% the peak-median difference and the threshold at 20% the peak-median difference to leave some tolerance for the filters to kick in.
One can also set a search range for the output using offset and amplitude for the ramp. The default is to just search from -10 to 10 V (offset 0, amp 10), which should suffice for most cases.
All that’s left to tell the device is to start searching, which can be done using the lockSearch property of a servo object. If a lock point is found, the device will activate the filter section on the given servo (which then holds the system in place). The lockSearch parameter will then be set to False/0 again, the locked parameter however to True/1. There is also a relock boolean, which will tell the device to automatically re-initiate a search once a lock is broken (maybe due to some disturbance etc).
All of those features directly translate to the GUI.
GUI
If you’re interested in using the user interface, the autolock widget is located within each servo section. It looks like this:
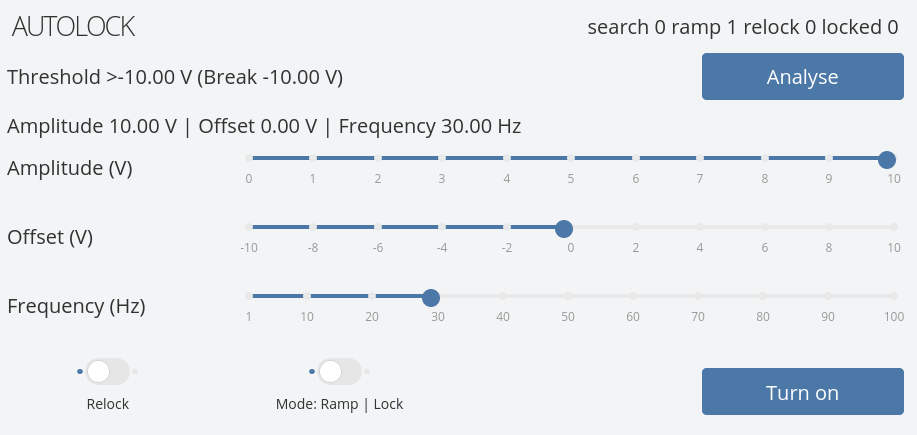
The label in the top right provides feedback on current autolock state and is updated every second. The labels on the left for threshold and range update on input. The values are fed back from the ADwin device directly.
Trigger a threshold analysis using the button “Analyse” to the right of the label. Change any ramping settings in whichever way you want.
You can enable relocking using the left switch on the bottom. The right switch determines whether you want to run the lock as a ramp (without “snapping” to a resonance point) or in lock mode. Turn the lock/ramp on or off using the button on the bottom right.
Command line version
If you are using our controller from the command line, while you may of course just resort to the properties listed above, we’ve implemented an autolock access point that is a little simpler to use, namely the :obj:Servo.autolock() function. Use it together with the lockAnalysis().
To enable the lock, simply use .autolock(). It will start a search with the default options or any you’ve previously set using the lock related properties. Though you may also pass some additional arguments. Please take a look at the function documentations as well, but here’s a little peak:
from nqontrol.servoDevice import ServoDevice
sd = ServoDevice(0)
s = sd.servo(1)
s.lockAnalysis()
# -> will give feedback if it works
s.autolock(True)  # will start a search
# -> 'LOCK SEARCH STATUS: True.'
s.autolock()  # by default
# -> 'LOCK SEARCH STATUS: True.'
# you can also pass options, but have to name them!
s.autolock(relock=True)  # will start a search at the same time
# -> 'Set relock option: True. LOCK SEARCH STATUS: True.'
s.autolock(darthvader="notyourdad")  # this is not a valid option, this is me meming. handy though if you have a typo
# -> "No options changed. Additional arguments were passed that had no effect: {'darthvader': 'notyourdad'}. LOCK SEARCH STATUS: True."
TTL
For the ramp of each channel a TTL trigger can be activated.
It always outputs a high signal when the ramp is enabled using the lowest ramp point for t=0, otherwise the output is low.